The Apache Tomcat Server. ←You can click that for the download page.
So, first thing. Yes, this is the same place that has the Apache HTTP Server, that everyone knows and loves. Second, what, you might ask, is a Java web servlet container? Well it is simply put, a java environment (aka, a program that is ran in the JVM) that will listen to packets and will respond based on the configuration and Java classes that you add to it. Tomcat serves up webpages, but you can modify how it serves them, modify the pages themselves, and even carry out all kinds of actions behind the scene, simply by dropping Java class files into specific folders in your Tomcat installation.
I won't go too deep into the history, but Servlets came about as a solution to the proliferation of CGI on the Internet. Basically, in order to make the web more dynamic, a web server would run a program (didn't matter if it was written in Perl, Python, C, C++) and whatever the output of that program was, that's what the web server would send back to the person. CGI just defined certain standards for how that worked. The problem with CGI was launching a program every time someone requested it, was pretty costly for CPU and memory. If the program was written in a script versus compiled code, oh it was worst!
Servlets allows the web server to start up in a JVM, that web server also has what is known as a "web container". The web container is a different part of the same program that talks to the web server. A request comes into the web server end and it checks to see if it can find a page or a container controlled resource that matches the request. If it is a page, the web server part sends the web page on to the requester. If it is a resource the web container handles, the web server asks the web container to do something about fulfilling the request. The web container runs the required Java class file, gets the output, and sends it to the web server to send back to the requester.
That all sounds a lot like CGI right? You'd be exactly right, but the difference is, the JVM is already running. So there is no cost associated with starting up a new instance of something for each request. The web container can intelligently handle requests, by pooling the requests together. If we have twenty requests for the Java resource called "FOO", then it would make sense to load "FOO", run all of the requests, and then load something else. Rather than serve the request for Java resource "BAR" after serving five requests for "FOO", while the other fifteen wait.
If you've ever used php_mod with Apache HTTP Server, then this is basically the exact same thing. Except instead of Java, we're using PHP. Basically the Apache HTTP Server hands off requests to the php_mod system to fulfill PHP resource request.
There are some finer detail differences that über-geeks would argue, and also, mod_php uses PHP. While Tomcat uses Java. So if you're more of a Java person, then it'd make sense to sink into Java servlets rather PHP.
Anyway, let's get started on downloading us some Tomcat...
The download link was provided above, but here it is again. We are downloading Tomcat version 7.0.33, which is the latest and greatest at the moment. However, that link should take you to the "7" page, so the link takes you to the latest and greatest Tomcat 7 version. So if by the time you read this, if Tomcat 7.0.46 is the newest version, the link will get you to the right place. However, if there's a Tomcat 8 (which there isn't a stable Tomcat 8, yet), that link won't get you there.
Tomcat 7 offers Java Servlet version 3.0 and Java Server Page (JSP) version 2.2. That might tell you squat at the moment. However, rest assured, that those are the most recent versions of those two standards. The standards are (in case you're curious) JSR-315 (Servlet 3.0) and JSR-245 (JSP version 2.2).
I highly recommend never, ever go back to the pre-Servlet 3.0 days. Eventually, I hope you'll agree with me and not just because I told you so.
Okay, so you've gone to the download page. I grab the tar.gz, but you might want to grab an installer or the zip file or what have you. Remember that we are looking at the section that says: core. There is also an embedded version (which does not mean it will run on a phone, it means that this version is for embedding in your own homemade Java web server program), some add-ons, and what-not. Right now we just want the core package.
Once, you've downloaded the tarball (or zip). You basically extract it wherever you want the server to reside. I usually extract it in "~/bin" which is where my Eclipse install is located, however, you can put it any where. Just remember where you placed it and make sure that you have permissions wherever you do put it, to read/write/execute.
Congrats you've just installed Tomcat, however, let's not start it up...just yet.
Eclipse integration...
Now we are going to tell Eclipse about our Tomcat install and allow Eclipse to handle starting and stopping the server. Also this will allow us to easily publish stuff to Tomcat from Eclipse. In a typical setup, you might have several servers listed in Eclipse. One for local development, one for remote testing, one for demonstrations and another as your actual production machine. Basically, you'll write your stuff in Eclipse and just change where it gets published to as the project matures. However, for now, we're just going to have the one.
Okay start up Eclipse, this is why we chose the EE bundle. It is going to already have the needed plugins required to manage servers. If you did not, download the EE bundle, then you need to install the EE plugins. To do that, from the Eclipse main menu choose: Help -> Install New Software...
You will see a dialog like the one below appear.
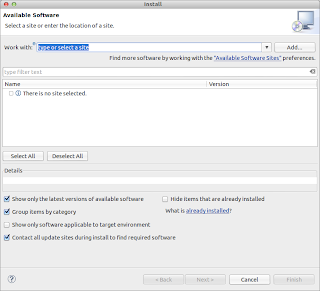 |
| The Install Dialog. |
You'll see a drop box labeled, Work With. Just drop that box and select the entry that says: Juno - http://download.eclipse.org/releases/juno. Now the middle box will begin to populate with software that it finds at that location. Look for the group called: Web, XML, JavaEE and OSGi Enterprise Development, basically install that whole group. Restart Eclipse and now you have all of the EE plugins.
Once you have done that, switch over to the "Java EE" perspective in Eclipse. A perspective is just a collection of useful tools for that type of task. To switch to the "Java EE" perspective, if it is not your default, click the Open Perspective button and select the new perspective and click OK.
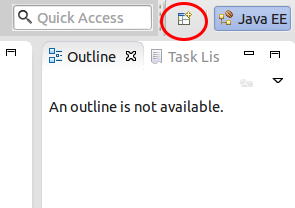 |
| Open Perspective button circled in red. |
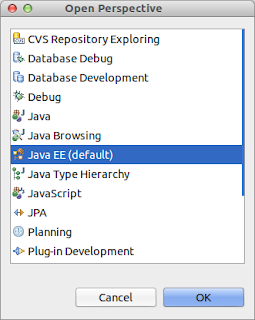 |
| Selecting the new perspective. |
| The server tab, it's a bit bare at the moment. |
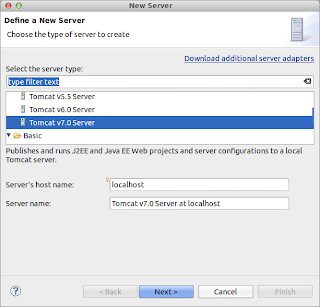 |
| Picking out the server type to add |
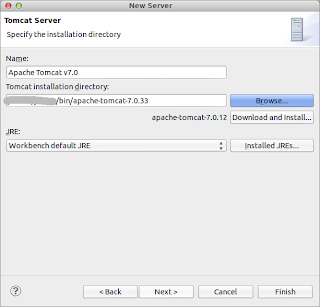 |
| Telling Eclipse where the system is installed at. |
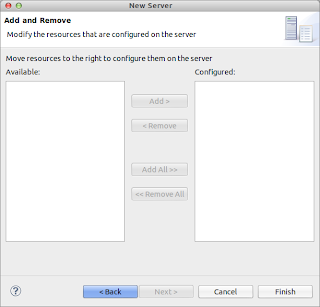 |
| We have created any projects yet, but this is a nice way of quickly adding them if we did. |
Ta-Da!
Eclipse now knows about your Tomcat install. You should be able to see the server in the Servers tab in Eclipse. It may say that for the moment, your server is currently stopped. Go ahead and right mouse click on the server and choose Start. After a bit of startup text that flies by you in the console, you're web server is now up and running!
| There is our new server. |
Now if you open a web browser and go to "http://localhost:8080", you'll get an actual reply back from Tomcat. It'll be a 404 error, since we didn't install any applications into the system, it doesn't have anything to run, but at least you are now getting some reply back!
Go ahead and stop the server before you leave Eclipse. I believe that Eclipse will stop the server before exit, but don't quote me on that. Just make it a habit to not leave the server running while you're not doing anything. There you go. Now you have Tomcat and Eclipse working together!
Tomcat comes with some default applications and some examples you can play with. I'll show you how to get some of those examples up and running. However, before you get serious, you'd want to remove the examples and what-not from the server. There's no point in having that junk on a production system.
Cheers!
No comments:
Post a Comment