Friday, November 30, 2012

JSP so you don't kill yourself

OMG you could never do a webpage in servlet!!

You are absolutely correct.  You could not realistically do an entire website in servlets.  So what gives?  Why even use this technology in the first place?!

Ah bear with me here.  For now I'm going to show you some basic JSP and when I mean basic, I mean old school baby!  However, it's good to have a good foundation.  So why didn't I show you Servlet 2.5, which is still supported by Tomcat?  I'll get to it, it was actually easier to show Servlet 3 first before anything else, that's how far Servlet has come in its life.

So JSP = Java Server Pages.  Tomcat has a third piece to it called a JSP compiler.  This JSP compiler takes a JSP page and creates a servlet from it.  I know cool!  The JSP can be a mix of Java code and HTML/CSS/JavaScript and if you have ever used PHP, you wouldn't be wrong to say that JSP looks a lot like JSP.

So let's write a basic JSP page that shows us the current date/time and says "Hello, World!".

We are going to continue to use our project called helloone.  First head over to the Project Explorer (on the left) pane and right mouse click on the WebContent folder.  Select New → JSP Page.  No I won't make you make a shell of a JSP page the hard way.  On the first dialog we are going to choose the location and the file name.  The location should be in the root of the WebContent folder and we are going to call this page, index.jsp.  I know how surprising.

Click next and you'll get another dialog.  On this dialog, you get to select a template.  There are JSF templates, which I will get to soon enough, and then there are like four or five type of JSP templates.  Right now we are going to learn the New JSP File (html) version.  This is the old school version.  Now click finish and the new semi-blank JSP page should appear in your code window.

Select location and file name
Select JSP template to begin with.
So let's type a bit into this code window.  Here's the code and I'll explain after the bump.

<%@ page language="java" contentType="text/html; charset=UTF-8"
    pageEncoding="UTF-8"%>
<!DOCTYPE html PUBLIC "-//W3C//DTD HTML 4.01 Transitional//EN" "http://www.w3.org/TR/html4/loose.dtd">
<html>
<head>
<meta http-equiv="Content-Type" content="text/html; charset=UTF-8">
<title>Insert title here</title>
</head>
<body>
 <h3>This is the JSP version.</h3>
 <h1><%= new java.util.Date() %></h1>
 <p>Hello, World!</p>
</body>
</html>

As you can see I've added an H3 tag, so we can tell the difference between our JSP version of this and our servlet version of this.  I've added a H1 tag with a weird tag enclosed by it.  And of course our "Hello, World!".

If you look closely you'll notice a tag at the top that is <%@ %> that was added by the template.

Let's go over each and all of the JSP tags while we're at it.

Type of tag What it means
<%@ %> JSP Directive — This is usually followed by an action or target like <%@ page %> or <%@ import %> These modify how the servlet is compiled.
<%= %> JSP Expression — An express is a single line of Java code, that if it is not a java.lang.String, then the toString() method is called. The JSP compiler turns these into printwriter.println([expression]);
<%! %> JSP Declaration — This expresses a piece of code that is located outside the doGet, doPost methods. If you needed your compiled servlet to have user defined methods, this be the place to put them.
<% %> JSP Scriptlets — This is code that is entered as you have typed it into the doGet and doPost method. The JSP compiler actually puts the code in a section called _jspService, but for all intents the effect is the code is inserted in verbatim into the resulting servlet.

There see, just four types of tags. I also tried to explain where a JSP compiler will put the code specified by each kind of tag into the resulting servlet.

So our first piece of JSP is a directive which will modify "page" attributes.  Here we set the content type to HTML and set the character encoding to UTF-8.  A DOCTYPE for HTML 4.01 compliance, some HTML and then we make it to the next piece of JSP code.  This is an expression, the piece of code emits a java.util.Date object, so the JSP compile will call the object's toString() method.  That converts the entire piece to:

printer_writer.println((new java.util.Date()).toString());

within the servlet.

The rest of the HTML code comes after that, and that's it.

Go ahead and save the JSP page and run the project in Eclipse.  Right mouse click on the project icon in the project explorer and choose Run as... → Run on Server.

Since this is called index.jsp, it will appear as the index page for the web application.  So you should see it by default in the Eclipse web browser.

Ta-da!  You've written your first JSP!  Now like I said this syntax is the JSP verions 1 way of doing stuff.  Eventually I'd like to show JSP 2.2 stuff as it is a lot more powerful.  However, as you can see.  Writing JSPs are a lot easier than writing servlets.  However, Servlets play a very big role in web applications.

Eclipse serves servlets on the quick.

You know I always say that it is better to learn something the manual way first before seeing it done the automatic way.  In this post, we created a servlet, but we did it the manual way.  Slowly adding the annotation, extending the class, over riding the methods we needed to over ride.

However, this isn't the 1990's.  Your IDE will do most of your work for you if you like.  When we right moused clicked you may have noticed something that I didn't touch on in the last post.  Here's a photo of what I'm talking about.

Wait, what?!  Add Servlet?!
Yes, that is correct.  Eclipse has a wizard for adding servlets to your project.  So let's go ahead and see what this wizard does by adding a Goodbye servlet.

Here's step 1 of the wizard:

Basic servlet properties
Here on step 1, you pick the class name of the servlet and the package it will be located in.  REMEMBER:  It is strongly recommend to not leave the package name blank, especially for web applications that are going to be facing the public web.  I cannot stress that enough.

Okay so I'm going to create my SayGoodByeServlet in the com.blogger.testing package, since I already have my SayHelloServlet in the same package.  On to step 2!

Basic Annotation properties for servlets
This step covers pretty much the stuff you'd see in the annotations, in this case the @WebServlet annotation.  When it comes to annotations it's pretty much convention over configuration.  If you change nothing here, then your @WebServlet annotation will follow convention.  Everything here is acceptable except the URL mapping.  I would like it to be "/Goodbye" so I'll click on it, click Edit and change that.

That's better
Now that we have that all setup let's move on to step 3!

The meat and potatoes of the class
Ah as you can see from this step, the wizard wants to know which methods you'd like to over ride.  By default the doGet and doPost are already selected.  Pretty much everyone on this planet is pretty convinced that at a minimum, these two should always be overridden.  I would have to agree with that, except in the case of super simple test servlets that people do on web blogs.  Pretty much you can get away with just doGet for "Hello, World!" but beyond that, you're going to at some point need doPost, to do anything useful with servlets.

Everything on this final step is fine as is, so I'll click the finish button., the generated code appears in the code editor windows.  Here's what it says:

package com.blogger.testing;

import java.io.IOException;
import javax.servlet.ServletException;
import javax.servlet.annotation.WebServlet;
import javax.servlet.http.HttpServlet;
import javax.servlet.http.HttpServletRequest;
import javax.servlet.http.HttpServletResponse;

/**
 * Servlet implementation class SayGoodByeServlet
 */
@WebServlet("/Goodbye")
public class SayGoodByeServlet extends HttpServlet {
 private static final long serialVersionUID = 1L;
       
    /**
     * @see HttpServlet#HttpServlet()
     */
    public SayGoodByeServlet() {
        super();
        // TODO Auto-generated constructor stub
    }

 /**
  * @see HttpServlet#doGet(HttpServletRequest request, HttpServletResponse response)
  */
 protected void doGet(HttpServletRequest request, HttpServletResponse response) throws ServletException, IOException {
  // TODO Auto-generated method stub
 }

 /**
  * @see HttpServlet#doPost(HttpServletRequest request, HttpServletResponse response)
  */
 protected void doPost(HttpServletRequest request, HttpServletResponse response) throws ServletException, IOException {
  // TODO Auto-generated method stub
 }

}

As you can see the automatically generated code, is pretty much on par with the code that we wrote just the other day.  Now we can remove those TODO comments and put down some actual code that will tell our system what to do.  Publish the new information to the server and see the wonderful results.

Having a good start on manually building a servlet really helps you to understand the bits that the wizard is doing for you automatically.  So I really recommend getting a peek at how it is done manually and then come and do this and see how it is done automatically.

Cheers!

Getting examples and your first Tomcat application

The examples included with Tomcat and a bit of silliness...

Okay so now you have Tomcat integrated with Eclipse.  When you integrate with Eclipse, Eclipse keeps what's known as a "metadata" copy of Tomcat information.

The reason for this is apparent if you were using a remote Tomcat that you didn't have the configuration files on some network share that you could access.  Tomcat provides a way to "publish" a web application via an upload.  However, for security reasons, you cannot change configuration files like this.  So you have to tune the Eclipse copy of the configuration files to match the server configuration before you have an In-Sync copy of the server on the local machine.

Let's head to Eclipse and understand this a little better.  On the Server tab right mouse click on your Tomcat server and select Properties.

The Properties of the server.  Location circled in red.
As you can see from the screenshot, the location is current set to [workspace metadata].  When you start the server from Eclipse, it will use the binary program that we have in "bin/apache-tomcat" but it will use the files located in the Eclipse metadata as the web and configuration repository.

This metadata location is [wherever you have your Eclipse workspace]/.metadata/.plugins/org.eclipse.wst.server.core/tmp0

I store my workspace in ~/src/eclipse-workspace, so my metadata copy of Tomcat is located in ~/src/eclipse-workspace/.metadata/.plugins/org.eclipse.wst.server.core/tmp0

Also note one more thing.  If you have more than one server in Eclipse, then you'll notice a tmp0, tmp1, tmp2…  The servers are numbered in the order in which they appear in Eclipse from top down.

Okay, so basically we could just change our location that we are using, but it is important to keep our copy in-sync in the Eclipse metadata.  So we are going to copy the example pages from the Tomcat install that we have in our bin folder to our copy in the metadata storage.

So head over to "bin/apache-tomcat-7.0.33/webapps/", or wherever you've extracted your Tomcat install.  There you will see the web applications that come with Tomcat.  They are:

  • docs  —  which is really just a bunch of pages of Tomcat documentation bundled up as a web application.
  • examples  —  which are the example servlets and JSPs and the code for those examples.  I'll go ahead and state that a lot of the examples are a bit out of date.
  • host-manager  —  I've never really used this web application but I believe that it allows you to control somethings in Tomcat via the web, which is silly, because that's a huge security hole.
  • manager  —  Which I think is a program that allows you to handle the web container side of Tomcat via the web.  Again, I've never used it.
  • ROOT  —  This is just a little welcome to Tomcat JSP application.  It acts as a hub for linking to all of the other web applications I just listed.
I'm sure you are starting to notice that web applications that you install in Tomcat are basically, stored in a folder and that folder is stored in the "webapps" folder.  You would be absolutely correct.  When we go to install an application into Tomcat, we simply just put the folder with all our files, images, and java classes into the webapps folder in Tomcat.  There a little more to it, like configuring connections to a database, restricting access to authenticated users and what-not, but that's the gist of very basic web applications.

So, basically what we are going to do, is copy the ROOT and examples web applications from the Tomcat folder and paste the folders into our metadata copy.

  1. Copy the ROOT and examples folder from the ~/bin/apache-tomcat-7.0.33/webapps/ folder.
  2. Paste the folders in the ~/src/eclipse-workspace/.metadata/.plugins/org.eclipse.wst.server.core/tmp0/wtpwebapps folder.
If you get a prompt to "merge" thing just go ahead and click "OK".

Now hope back into Eclipse, start up your server from Eclipse, open browser to http://localhost:8080 and poof!  You should now see the Tomcat welcome page as oppose to the 404 error you got last time.

Making your first servlet...

And now it is time to make your very own servlet!  I know exciting!  Here's the basic breakdown.

Tomcat is expecting your Java class files to have certain hooks that it can latch onto, in order to run your Java code.  It use to be that your class would have to extend a standard base class and then you'd create an XML file that the server would read which would help it to figure out how to latch onto your class file.  It was all a very crazy mixture of XML files and Interfaces.  The nice thing about Java servlet version 3.0 is, you don't have to do that any more!  Hooray!!  There are these things now called Java annotations that you can add to your class file.  Annotations don't do anything code wise, but they allow you to mark certain sections of your code as something, sort of like HTML markup.  Basically, you can now annotate you Java class, and Tomcat will read the annotations to figure out how to hook into your Java class.

Easy stuff!  You can still do it the old way.  In fact, if you do provide an XML file, it will override whatever annotations are found.  The old way is still very useful for commercial products that just give you compiled class files and allow you to fine tune the program for your needs by editing XML files.  You obviously can't change the annotations in a compiled class file.

So our very first servlet is basically going to write to the screen, the current time and "Hello, world!".  To begin, let's click on the "New Project" button on the toolbar.  Here's a picture of the button.

This creates a new project
When you click that button, basically a dialog will appear and ask you what kind of project do you want to start.  In Eclipse, there are easily enough type of projects do keep you guessing.  The type we want to start is in the "Web" folder and is called a "Dynamic Web Project".

Dynamic Web Project
You can always use the filter box if you aren't crazy about scrolling towards the near bottom to find this folder.  Once you have it selected, click the Next button to begin setting up the project.  Now you'll get a screen with what looks like a ton of options.

This is one of three screens in the wizard but this is the only one I'll be covering for now.
In this dialog of the wizard you set the basic properties of your web project.  I'm going to call the project "helloone".  I go ahead and use the default location for the project, which would be in my workspace.  The target runtime should be our Tomcat server that we have installed.  You will notice a drop down that shows "Dynamic web module version".  Use version 3 as this is the latest version and corresponds to servlet 3.0.  We will use the default Tomcat configuration for our project (note, this is the project configuration, not the server configuration).  You don't have to worry about the other options.

Go ahead and click Finish as you won't need any of the other steps from the wizard.

You will now see your new project in the "Project Explorer".

The new project "helloone" and all the different groups under it.
Inside your project you'll see a bunch of different groups.  Like JAX-WS, WebContent, etc…  For there being a lot of stuff, your project is actually empty at the moment.  These groups are just there to help you create stuff, if you needed to create a new Web Service point in your servlet, well you can see where you'd go for that.  Right now we are just going to create a simple servlet that will print the current date/time and "Hello, World!".

A servlet is a Java resource so we will right mouse click on "Java Resources" and choose New → Class and get the "New Java Class Wizard".  We just want to create a very basic class, so just fill out the dialog as follows:

This creates a very, very basic class in Java
Basically, I am putting the class into the package called "com.blogger.testing" and the name of the class is "SayHelloServlet".  Click Finish and who should have your class appear on the coding window.

Our new class added
Now let's add some code to get to handle all the needed things for being a servlet, because at the moment our Tomcat server would have no idea what to do with this class.  Begin by placing the cursor just above the class statement (public class…) and type 

@WebServlet("/Hello")

Eclipse will underline this statement with a red wavy underline.  That means there is a problem with the code.  move you cursor so that it is somewhere within the offending code and a "quick fix" tool tip will appear.  Click on the quick fix to "import javax.servlet.annotation.WebServlet".  This will add the import statement to your class file.

Now we are going to say our class extends the basic HttpServlet class.  We need to extend this class as it brings in all the needed hooks into our class that Tomcat is expecting.  To extend our class we just need to add a bit of code.

Change this... To this...
public class SayHelloServlet public class SayHelloServlet extends HttpServlet

So basically you are just adding "extends HttpServlet" to the end of the class statement.  Eclipse will yet again, underline the new code.  Click on the code and in the quick fix, import the javax.servlet.http.HttpServlet class.

You should now see a little light bulb with a warning exclamation sign on it.

That means Eclipse wants to help you out on something.  Usually, these things won't keep your code from working but it's good form to address something here.  In this case, HttpServlet is marked Serializable, and thus your class should provide a Version UID.  It's a good idea to go ahead and do this.  I usually just go for the default value as opposed to a randomly generated one.  Click on the light bulb and make your choice.

The default UID looks like this:

private static final long serialVersionUID = 1L;

Okay now, all of the underlines and light bulbs have been dismissed.  We now have all the hooks that we need for Tomcat to interact with with our class, but at the moment, absolutely nothing will happen.  So let's make something happen!

First things, first.  Let's create a no argument constructor.  It's important that we at the very least have this going forward.  To do this in the outline pane on the right, right mouse click the class (that's the green ball C).

This is the outline pane, very useful for moving around in classes

Once you right click select Source → Generate Constructors From Superclass...  You don't really need to mess with the dialog that pops up, just click OK.  Now you have your no argument constructor.  Next we need to override the "doGet" method from HttpServlet.

The reason we will be over riding this method is that when the web server receives a HTTP GET request from a client, the web container will call this method.  By default the method does nothing, in fact, by default all of the methods do nothing.  You are going to over ride this method with your own custom method.

To over ride the method, again, right mouse click on the class in the Outline pane and select Source → Override / Implement Methods...  A dialog will appear and you should select the "doGet" method by checking the box beside it.  You can also do some automatic generation of the comments for this over ride by checking the box to do so toward the bottom of the dialog.  I usually don't however as I like my own comments on code.

You'll see that in the code editor pane the new code has been added.  Go ahead and remove the code that says:

super.doGet(req, resp);

That removes any reference to the default code of "do nothing".  Now, you are ready to implement your own response.  Take a look at my code below and I'll explain what I did right after.

package com.blogger.testing;

import java.io.IOException;

import javax.servlet.ServletException;
import javax.servlet.annotation.WebServlet;
import javax.servlet.http.HttpServlet;
import javax.servlet.http.HttpServletRequest;
import javax.servlet.http.HttpServletResponse;

@WebServlet("/Hello")
public class SayHelloServlet extends HttpServlet {

 public SayHelloServlet() {
  super();
  // TODO Auto-generated constructor stub
 }

 private static final long serialVersionUID = 1L;

 @Override
 protected void doGet(HttpServletRequest req, HttpServletResponse resp)
   throws ServletException, IOException {
  // TODO Auto-generated method stub
  java.util.Date d = new java.util.Date();
  java.io.PrintWriter pw = resp.getWriter();
  resp.setContentType("text/html");
  pw.println("<html><head><title>Sample 01</title></head><body>");
  pw.println("<h1>" + d.toString() + "</h1>");
  pw.println("Hello, World!");
  pw.println("</body></html>");
 }

}

You can always remove all of those TODO comments out of the code.  As you can see.  I create a new java.util.Date called d.  That stores our date.  Next I created a PrintWriter called pw.  This will provide us a way to write to the response that will be sent back to the client.

I then start writing HTML to the print writer and I convert the date to a string so that it can be written to the print writer.

So that's about it, now let's go ahead and run this servlet and see what happens!  To run the program that we've just created, in the project explorer (remember the pane on the left), right mouse click on the top level object of our project (looks like a blue folder called helloone) and choose Run As → Run on Server option.

A run dialog will appear but you can just click on the Finish button.

And...  WAIT!  You got a 404 error!?  Of course you did.  If you look back at our code notice the @WebServlet("/Hello") part.  The part in quotes is what you need to add to the URL to get the results.  So the correct location should be…

http://localhost:8080/helloone/Hello

The helloone is the name of the web application and Hello is the name of the servlet inside the web application.

Hooray our first servlet!
Now you've had a taste of your first web servlet.  I know most likely you are thinking that this has got to be a pain to code in if I have to encode a whole web page into Java code.  However, servlets aren't exactly made for serving up pages as it is more along the lines of doing the leg work in web applications.

I will try to make it clearer as to the purpose of servlets, but for now, you've had the ability to sink your teeth into it a little bit.  I'll try not to make the post this crazy long again, but I did cover a lot of fundamentals here.

Cheers!

Thursday, November 29, 2012

Tomcat 7 and Eclipse Integration

Well it'd be a shame if you have Eclipse installed but had no servers to publish to!  So let's fix that, eh?  Let's go out there and get the most loved Java web servlet container out there...

The Apache Tomcat Server.  You can click that for the download page.

So, first thing.  Yes, this is the same place that has the Apache HTTP Server, that everyone knows and loves.  Second, what, you might ask, is a Java web servlet container?  Well it is simply put, a java environment (aka, a program that is ran in the JVM) that will listen to packets and will respond based on the configuration and Java classes that you add to it.  Tomcat serves up webpages, but you can modify how it serves them, modify the pages themselves, and even carry out all kinds of actions behind the scene, simply by dropping Java class files into specific folders in your Tomcat installation.

I won't go too deep into the history, but Servlets came about as a solution to the proliferation of CGI on the Internet.  Basically, in order to make the web more dynamic, a web server would run a program (didn't matter if it was written in Perl, Python, C, C++) and whatever the output of that program was, that's what the web server would send back to the person.  CGI just defined certain standards for how that worked.  The problem with CGI was launching a program every time someone requested it, was pretty costly for CPU and memory.  If the program was written in a script versus compiled code, oh it was worst!

Servlets allows the web server to start up in a JVM, that web server also has what is known as a "web container".  The web container is a different part of the same program that talks to the web server.  A request comes into the web server end and it checks to see if it can find a page or a container controlled resource that matches the request.  If it is a page, the web server part sends the web page on to the requester.  If it is a resource the web container handles, the web server asks the web container to do something about fulfilling the request.  The web container runs the required Java class file, gets the output, and sends it to the web server to send back to the requester.

That all sounds a lot like CGI right?  You'd be exactly right, but the difference is, the JVM is already running.  So there is no cost associated with starting up a new instance of something for each request.  The web container can intelligently handle requests, by pooling the requests together.  If we have twenty requests for the Java resource called "FOO", then it would make sense to load "FOO", run all of the requests, and then load something else.  Rather than serve the request for Java resource "BAR" after serving five requests for "FOO", while the other fifteen wait.

If you've ever used php_mod with Apache HTTP Server, then this is basically the exact same thing.  Except instead of Java, we're using PHP.  Basically the Apache HTTP Server hands off requests to the php_mod system to fulfill PHP resource request.

There are some finer detail differences that über-geeks would argue, and also, mod_php uses PHP.  While Tomcat uses Java.  So if you're more of a Java person, then it'd make sense to sink into Java servlets rather PHP.

Anyway, let's get started on downloading us some Tomcat...

The download link was provided above, but here it is again.  We are downloading Tomcat version 7.0.33, which is the latest and greatest at the moment.  However, that link should take you to the "7" page, so the link takes you to the latest and greatest Tomcat 7 version.  So if by the time you read this, if Tomcat 7.0.46 is the newest version, the link will get you to the right place.  However, if there's a Tomcat 8 (which there isn't a stable Tomcat 8, yet), that link won't get you there.

Tomcat 7 offers Java Servlet version 3.0 and Java Server Page (JSP) version 2.2.  That might tell you squat at the moment.  However, rest assured, that those are the most recent versions of those two standards.  The standards are (in case you're curious) JSR-315 (Servlet 3.0) and JSR-245 (JSP version 2.2).

I highly recommend never, ever go back to the pre-Servlet 3.0 days.  Eventually, I hope you'll agree with me and not just because I told you so.

Okay, so you've gone to the download page.  I grab the tar.gz, but you might want to grab an installer or the zip file or what have you.  Remember that we are looking at the section that says: core.  There is also an embedded version (which does not mean it will run on a phone, it means that this version is for embedding in your own homemade Java web server program), some add-ons, and what-not.  Right now we just want the core package.

Once, you've downloaded the tarball (or zip).  You basically extract it wherever you want the server to reside.  I usually extract it in "~/bin" which is where my Eclipse install is located, however, you can put it any where.  Just remember where you placed it and make sure that you have permissions wherever you do put it, to read/write/execute.

Congrats you've just installed Tomcat, however, let's not start it up...just yet.

Eclipse integration...

Now we are going to tell Eclipse about our Tomcat install and allow Eclipse to handle starting and stopping the server.  Also this will allow us to easily publish stuff to Tomcat from Eclipse.  In a typical setup, you might have several servers listed in Eclipse.  One for local development, one for remote testing, one for demonstrations  and another as your actual production machine.  Basically, you'll write your stuff in Eclipse and just change where it gets published to as the project matures.  However, for now, we're just going to have the one.

Okay start up Eclipse, this is why we chose the EE bundle.  It is going to already have the needed plugins required to manage servers.  If you did not, download the EE bundle, then you need to install the EE plugins.  To do that, from the Eclipse main menu choose: Help -> Install New Software...

You will see a dialog like the one below appear.

The Install Dialog.

You'll see a drop box labeled, Work With.  Just drop that box and select the entry that says: Juno - http://download.eclipse.org/releases/juno.  Now the middle box will begin to populate with software that it finds at that location.  Look for the group called: Web, XML, JavaEE and OSGi Enterprise Development, basically install that whole group.  Restart Eclipse and now you have all of the EE plugins.

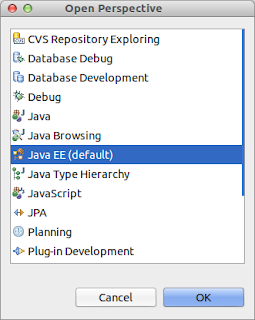
Once you have done that, switch over to the "Java EE" perspective in Eclipse.  A perspective is just a collection of useful tools for that type of task.  To switch to the "Java EE" perspective, if it is not your default, click the Open Perspective button and select the new perspective and click OK.

Open Perspective button circled in red.
Selecting the new perspective.
At the bottom of the IDE you will see the Servers tab.  Click on the tab, this is where we are going to tell Eclipse about our new Tomcat installation.  You do so by clicking on the link inside that panel called the New Server Wizard.

The server tab, it's a bit bare at the moment.
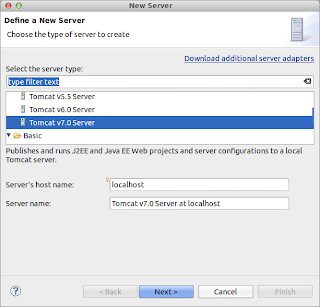
You'll now be presented a dialog that allows to tell Eclipse what kind of server you want to add to the Eclipse environment.  This shouldn't be rocket science here, open the "Apache" folder and look for the Tomcat v7.0 Server entry.  You can optionally use the filter box to find the entry.  If at some point in your life, you are going to be working with a sever that just doesn't come with Eclipse, there is a link on that dialog that says, Download additional server adapters.  Adapters, basically tell Eclipse how to publish to a server, how to start/stop the server, and what not.  Basically, it's just a bundle of magic that allows you to seamlessly connect Eclipse to your server.  You don't always need the adapter to develop for the platform, it just makes it a little easier as it saves you some "copy/paste" time.

Picking out the server type to add
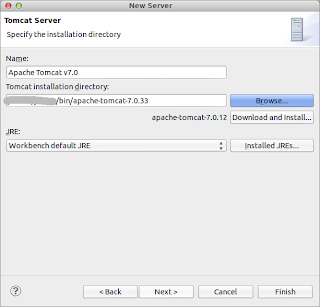
So once you have the server type selected, click on the Next button.  Basically, this dialog asks where you installed the thing.  If we're talking about a remote server here, you still need physical access to the files (via either NFS, CIFS, SMB, or whatever) if you want to be able to change the configuration files from Eclipse.  Since ours is local, we don't have to really worry about much, except just pointing it at correct directory.

Telling Eclipse where the system is installed at.
You'll notice that if you hadn't downloaded Tomcat, Eclipse offers a button that would do just that for you, albeit the 7.0.12 version.  Once you have that information in, go ahead and click the 
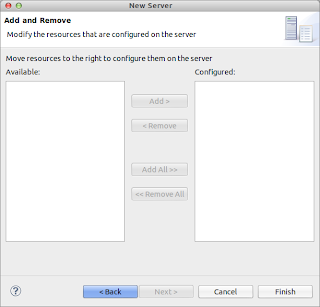
Next button.  You'll be brought to the add projects dialog.  We haven't created any projects so basically you can leave this blank and click Finish.  This is a nice way to bulk import web projects that you may have already built in Eclipse for a different server.  However, like I said, we haven't done anything yet, so the panes are empty.

We have created any projects yet, but this is a nice way of quickly adding them if we did.

Ta-Da!

Eclipse now knows about your Tomcat install.  You should be able to see the server in the Servers tab in Eclipse.  It may say that for the moment, your server is currently stopped.  Go ahead and right mouse click on the server and choose Start.  After a bit of startup text that flies by you in the console, you're web server is now up and running!

There is our new server.
Now if you open a web browser and go to "http://localhost:8080", you'll get an actual reply back from Tomcat.  It'll be a 404 error, since we didn't install any applications into the system, it doesn't have anything to run, but at least you are now getting some reply back!

Go ahead and stop the server before you leave Eclipse.  I believe that Eclipse will stop the server before exit, but don't quote me on that.  Just make it a habit to not leave the server running while you're not doing anything.  There you go.  Now you have Tomcat and Eclipse working together!

Tomcat comes with some default applications and some examples you can play with.  I'll show you how to get some of those examples up and running.  However, before you get serious, you'd want to remove the examples and what-not from the server.  There's no point in having that junk on a production system.

Cheers!


Getting started

I have no idea where we are going...

I'm just going to post something small.  Getting Eclipse.  I'm a big Netbeans kind of guy.  However, let's learn Eclipse.

First you will need a JVM on your system.

I use OpenJDK 7, you should too.  Java version 7 has a lot of cool features that you should really start using.  Yes, there are some security concerns about Java, but the main baddies out there require users to visit laced websites.  Users should go to sites they get in emails, in the first place, and second, use Java carefully.  For the most part we're going to be talking developer stuff, so if you are paranoid, only have developers have Java.

Okay next we need to download Eclipse.  The current version is 4.2 Juno, which is what I recommend you get.  It has all of the latest and greatest hooks for all the current stuff and looks great on GTK desktops.

Go here to grab it.

I run 64-bit Linux and for some reason I'm feeling EE tonight so that's the binary I grab.  If you are a Windows box or Apple box the page will reflect the platform.  If you don't dig the Java EE thing, grab a different flavor.  The only difference is the plugins that come with the file, it's not like you cannot download more plugins later.

Once you have the tar.gz file (or zip file for Windows), I usually place it in a folder in my home directory called "bin".  You should be able to right click the tarball and select "Extract Here" or whatever it is for your platform.

Some pictures...
The tarball file.

Extract Here action


Now you should have a folder in your bin directory called eclipse.  Go ahead and move the tarball into the eclipse folder, that's just what I do, you can archive the file if you want.

You will eventually see a launcher icon called, er, eclipse.  Double click it to get the Eclipse splash screen and start loading the IDE.
Launcher File
Splash screen, pretty!
At some point you are going to be asked for a location for a workspace.  This is basically a place on your disk where your projects will be stored.  I usually keep quite a few workspaces on my system, I'm going to call me src/eclipse-workspace.  That's just how I name things, you can leave the default if you like it better.

I don't normally check the "do not ask again" checkbox, because I have a lot of workspaces.
Once you have your workspace selected, click OK and you should get the Welcome screen.  Welcome to Eclipse!

TA-DA!

Okay so where am I going with this?  No idea.  I guess tomorrow we will download Apache Tomcat and make Eclipse aware of the Tomcat install.  Sounds like a brilliant idea.  (I'm usually a Glassfish kind of guy but apparently I'm going to go outside my comfort zone here for a while.)

Cheers!

Thursday, November 15, 2012

LOOKUP, VLOOKUP, and HLOOKUP in Excel

One of the litmus tests of knowing Excel and actually knowing Excel is the LOOKUP family of functions. If you ever go to a job interview where there is a heavy focus on Excel, you are more than likely to find a question about the LOOKUP function. That's not to say the function is super powerful or anything, in fact, it basically is the Find function in Excel just in equation form (sorta). The LOOKUP family of functions are not famous for what they do but for what role they play when trying to do pretty advance stuff in Excel. In other words, the LOOKUP family of functions by themselves aren't all that useful, but they are critical if you want to implement advance functionality without the use of VBA code. The COUNTIF and SUMIF function are pretty much up there with the LOOKUP family, in that they provide some useful functionality alone, but their true power doesn't come about until you use them in combination with other things. Well anyway let's look at the family of LOOKUPs.
Excel Function Short little description
LOOKUPProvides 1-to-1 matching of data
VLOOKUPUses the left most column of a table to provide matching
HLOOKUPUses the top most row of a table to provide matching
So what does this all mean? Let's begin with looking at a simple Excel sheet.
As you can see you have a Part, Price, and Contact column. Now with this table let's see what result we get from each function, let begin with looking at the parameters for LOOKUP. =LOOKUP(value,lookup_vector,result_vector) value, which is required, is the value that you want to find. lookup_vector, which is also required, is the list of items (aka range) that you want to search for a match. result_vector, which is optional, is the list of of items that should be returned once a match has been found. The catch to this function is that the lookup_vector MUST be in ascending order or else you will get some funky results. So let's say you do that, we will sort the Part column in ascending order and then write our function as such in cell E1. =LOOKUP(E2,A2:A11,B2:B11) Right now the return value will be #N/A, but if you type "Hand Saw" into cell E2, E1 will equal 18.95. Let's see why, this is the table sorted by column A, which is our Part column:
r/cABC
1PartPriceContact
21 gal. Paint$8.95 Bob
31/2 gal. Paint$5.89 Bob
415 ft. Ladder$22.95 Jane
52" Screw$0.20 Earl
62.5" Screw$0.22 Earl
73 ft PVC Piping$11.43 Betty
87 ft. Ladder$28.96 Jane
9Electric Saw$39.95 Joe
10Hand Saw$18.95 Joe
11T-Joint PVC$1.73 Betty
The lookup formula says to use the value in E2 to find a match in cells A2 through A11. When we set E2 = "Hand Saw" it finds a match in A9 which is the 8th line that we searched. Thus the 8th result in B2:B11, which is $18.95, will be returned. Again, this only applies when the lookup_vector is sorted in ascending order. The result_vector is optional, if you omit it, then it will return the match to you, in other words it would act like you had typed: =LOOKUP(E2,A2:A11,A2:A11) Which doesn't seem like it would be useful but is if you are doing something like checking if a person is on a list or not, which could be done with COUNTA but I'll talk about that later on down the road. Again, the end result doesn't seem so spectacular, especially given that you can always use CTRL+F to find what you are looking for. Repeat with me, "It's not about the direct results but what you can do with it with other functions." LOOKUP has another, different, syntax that uses an array. I will cover that syntax in a later post, but it basically does the same thing except instead of providing a range of cells to look at, you provide a static list of items to check against. Also, LOOKUP not only works looking down but can also look across, let's transpose our table and look at it like this.
r/cABCDEFGHIJK
1Part1 gal. Paint1/2 gal. Paint15 ft. Ladder2" Screw2.5" Screw3 ft PVC Piping7 ft. LadderElectric SawHand SawT-Joint PVC
2Price$8.95 $5.89 $22.95 $0.20 $0.22 $11.43 $28.96 $39.95 $18.95 $1.73
3ContactBobBobJaneEarlEarlBettyJaneJoeJoeBetty
This method is a little harder because Excel doesn't give you an easy way to sort a row in ascending order, but this is what it looks like. You can now do the exact same thing using this code and placing this formula in cell A4: =LOOKUP(A5,B1:K1,B2:K2) Typing "Hand Saw" in A5 will result in A4 = 18.95 This is useful for times when you have things where each column is a month and you want to look at a single value per each month.
Let's look at VLOOKUP, VLOOKUP is an explicit LOOKUP going up and down. LOOKUP can go left to right or up and down, VLOOKUP is restricted to just up and down. However, VLOOKUP is a little better because things do not need to be sorted in ascending order (if preconditions are met), just each item in the lookup vector has to be unique (well that's not a requirement, just that if there are two of the same thing in the result vector, only the first match will be returned.) Also, VLOOKUP is a little faster than LOOKUP itself. That's because with LOOKUP Excel has to determine which direction the lookup is happening in before evaluating. So let's take a look at VLOOKUP. =VLOOKUP(lookup_value, table_array, col_index_num, range_lookup) lookup_value, which is required, the the value you want to lookup to find a match. table_array, which is also required, is the table that you want to lookup in. col_index_num, which you guessed it is requires, is the column from that table that you want the result to return. range_lookup, which is optional, is a little more difficult to define so I'll cover that in more detail below. The lookup_value parameter should already be obvious to you. That's basically what you want to compare. However, the next one, table_array may have you a bit miffed. This is a single to multiple column range. So A1:A123 and A1:E123 are both valid inputs. You might be asking yourself, if we have multiple columns, how does Excel know which column to search to find a match? The answer is that VLOOKUP will always search the first (left-most) column [I'm not sure if that logic is reversed for countries that read right-to-left] for the value that is given in the lookup_value parameter. The third parameter is the col_index_num. If a match is found, then it is this column number in the table_array that is returned. This is what usually confuses people because the column being searched in 1, the next column is 2, and so on. People sometimes think, this is the fifth column in the worksheet, but it may only be the third column in the table_array. The last parameter, range_lookup, is a hard one to remember because it changes how the whole function will work. Basically the parameter accepts a TRUE or FALSE value. Paradoxically, TRUE means to NOT do an exact match and FALSE means to do an exact match. I've heard it a million different ways. Basically, TRUE means find exact or close to exact match, FALSE means find exact match only. How you answer this will affect how the functions works. Let's look at if we state TRUE. Here we MUST have the list in ascending order. Also, you cannot use any kind of wildcard, or at least use a wildcard and expect some results. Multiple entries of the same value will return the first value in the list. So if you have "Popcorn Cheese" and "Popcorn flavors" and your lookup_value = "Popcorn". You are going to get "Popcorn Cheese". FALSE changes a few things. The list can be in any order! You are allowed to use wildcards! That means you can lookup "Ba?" and it will look for any three letter words which begin with "Ba" In the event of multiple entries that matching what you are searching for, only the first, AS THE LIST IS CURRENT LAYOUT, will be returned. The catch here is that if you resort the list differently, you'll get a different result. That last part can be the most confusing. So basically a VLOOKUP allows us to use a table and if we use the FALSE option, then you don't have to worry about the table being in order. Most of the time you will want to use VLOOKUP, because you don't have to worry about the list being in order. However, TRUE or FALSE, you do have to have some concern about duplicate entries within the table. You can always use COUNTIF to determine if duplicates exist and if so how you want to handle that kind of situation.
Now I would go into detail about HLOOKUP but it is pretty much VLOOKUP but looks left to right as opposed to top to bottom as VLOOKUP. So there isn't much more to cover about it. One of the big questions I get about HLOOKUP is, "What do you use it for?" VLOOKUP seems pretty useful because it searches in the same manner as databases tend to spit out information. HLOOKUP doesn't seem so useful since databases tend not to spit information out from left to right. Now I can't speak for everyone, but I use HLOOKUP for zoom-in functionality. Let's say you have a table with factors on the far left and dates as the column headers. Basically what you want to do is allow a drop down that allows the user to select a factor in the far left column and then type in a date. With these two inputs, provide the data at intersection. Basically what we want to do is use HLOOKUP. The first parameter is the date we've typed in, the table is obviously the table we made up, and the return row is the row number that we've selected from the drop down. Since the dates are pretty much in ascending order 01/01/2011 to 01/01/2012 (for example), you don't have to use FALSE, you can use TRUE. So wait a second how exactly is this useful? Imagine you need to extract data quickly out of a spreadsheet that your boss uses to keep track of things. HLOOKUP would be perfect, so long as your boss keeps the format the same all the way across. Things look the way your boss wants it to look, and you're able to pull useful information from the spreadsheet, without having to yank your hair out! It's win, win! That's what make the LOOKUP family of functions so important. They are useful tools in extracting data from complex sets. Once you have the data extracted, you in all your wonderful Excel glory can then begin to normalize it, because we all know that the first step to taking your boss' crazy Excel sheet and placing it into a nice and neat Access file, is to normalize it.

A Quick lesson on MOD

In our everyday life we see things that repeat once we get to a certain point. For example, let us say you have 463 eggs. How many dozens of eggs can you make? How many would be left over? We know this a division. We know that if we take 463 and divide by 12 will we receive 38 with a remainder of 7. Thus we have 38 dozens plus 7 eggs left over. Same thing with warehouses. Let us say you must pack 40 widgets into a box and the rest will go into a shipment bag. You are to prepare 7343 widgets for shipment. How many boxes will you need? How many widgets will be in the bag? Excel provides a function that is rarely used, but if perfect for instances where we need to indicate a cycle like feature into calculations. That function is called MOD. Let's look at the parameters for MOD: =MOD(number, divisor) Both parameters are required. The number is the number you wish to divide, and the divisor is the number that you are dividing by. In essence, this function will return the remainder of the divide. So if we were to say =MOD(463,12) we would receive the number 7 as our answer. I know what you are thinking, "Oh wow, that seems pretty useless." Let's graph mod shall we?
Here we are using a MOD 4. So the numbers repeat 0, 1, 2, 3, 0, 1, 2, 3 ... You can see the cyclical nature of MOD from the graph. So anything that requires a calculation with a cyclical nature can usually be solved pretty easily with MOD. The trouble is trying to wrap your head around the notion of, "What is cyclical?" Sometimes it is not very obvious that we are talking about something that keeps repeating. Let's take an example of something I learned in Algebra II in high school. Let us say you are tasked to be given a number, you must find the next highest number that is a multiple of fourteen. You are then to take that next highest number and figure out the difference between that number and the number given. You might see this in the real world as, "I want all my widgets to come in boxes, boxes hold 14 per box. I may order something that is not a multiple of 14. Therefore, you are increase the order to the next highest multiple of fourteen." Here the cycle is 14. We need to make a box every time we hit fourteen. If the order comes in at 15, we know that we need to up the order by 13 to 28, since 14*2 = 28. However, how do we make Excel do this kind of calculation? We know that =MOD(15,14) will give us 1. We could then say 14-1 = 13 + the order = 28. Thus if our ordered number is cell A1 and our fill amount is A2, then the next highest number could be in cell A3: =A2-MOD(A1,A2)+A2 However, there is a problem with that. It stops working correctly if the number ordered is indeed a multiple of 14. So if we say the customer has ordered 28, then we need not calculate anything because 28 is a multiple of 14. So how do we work around this? We could use an if statement, but that doesn't seem very elegant. This is where my high school algebra class comes into play. Remember that mod is a cycle. What we truly need is how far away are we from reaching a multiple of 14. So if the order is 1, we are 13 from a full box; if the order is 7, we are 7 from a full box; if the order is 14, we are zero from a full box. So we know that =MOD(13,14) would give us 13, which is pretty much what we want the answer to 1 to be. So let's try =MOD(1*13,14). Since the number eventually comes out to be 13, we basically say that 1 is 13 steps from 14. Let's try 2 which is 12 steps from 14. =MOD(2*13,14), which happens to be 12! You will see that =MOD(A1*(A2-1),A2) will always tell you the number of steps you are from reaching the next highest number. Let's graph it:
As you can see, the cycle repeats in the red line. Now I'm cheating here, because I didn't give you the math as to why this is. However, now that you are armed with that knowledge, I'll leave proof to the reader. You can now say that =MOD(A1*(A2-1),A2)+A1 There you go! Now you have a formula that will work for your customer.

Data Validation in Excel

Okay so let's say you have an Excel sheet and you want your user to type into a column the month something happened on. The problem with the general approach that people take with Excel sheets is that they don't explain exactly what they are expecting. Months could be January, Jan, or 01. Without spelling it out to users, you could have all kinds of results. Enter Data Validation... What this allows you to do, is specify what values are valid and which are not. You can provide an error message box for invalid values, you can provide a popup explaining what the user is to do when the cell is selected. You can also limit input to a list and then have that list provided as a drop down. Data validation provides a way to get consistent input for a column, which is very important! Let's take a look at where data validation is location on the Ribbon.
As you can see the Data Validation button is located on the Data tab, inside the Data Tools group. To use data validation, select the cell that you want to apply validation to and click the button. You will get a pop up box that presents three tabs: Settings, Input Message, Error Alert. The last two tabs (Input Message and Error Alert) basically show a popup message. The input message has a title and message and the message appears when the user clicks on the cell. The input message appears comment style, aka like a little yellow bubble coming out of the cell. The error alert appears when invalid data is entered and appears pop-up dialog style, stealing the focus from Excel proper. The error alert also has title and message, but also has dialog icon. The real meat and potatoes of this pop-up is in the Settings tab. By default, no data validation is equal to setting the Allow drop box to "Any value". Here's a list of the valid things you can select from in the Allow drop down list:
  • Whole number (this is a non-decimal number)
  • Decimal (this is a decimal number which means a non whole number)
  • List (this is a predefined list.) **I will explain this one a little more in a bit.
  • Date (this is a valid date, no time)
  • Time (this is a valid time, no date)
  • Text length (limit entry to a number of characters)
  • Custom (allows you to specify a formula that will return true or false)
Now the Whole number, Decimal, Date, Time, and Text length all allow you to specify if you want a range of valid values (a < x < b), less than (or equal to) a value (x < a), greater than (or equal to) a value (x > a), not between values (a > x > b), equal to a specific value (x = a), and so on... Basically all those basic algebraic expressions. Again, custom is basically just using a formula. So that leaves us with the last option List. Now list is the one that I use the most often because it is the one that grants a drop-down box when you click the cell. You can either use a range on the sheet or you can provide a static list in the source box. Note: If you decide to use a range, it must be a range on the same exact sheet as the data validation. Excel will note let you choose a range on a different worksheet. To use a static list, just type the values you want to appear and put a comma between each value. On most of the validation options you can choose to ignore blanks or not. Ignoring blanks, means that when someone clicks the cell, if they don't enter anything, it won't count as an error. If you stop ignoring blanks then as soon as someone clicks the cell, they must enter a value that is valid to escape. If you decided to turn off ignoring blanks, make sure you make it crystal clear what is and is not valid. Nothing is more annoying than to not be able to escape a cell in an Excel worksheet. So that's cell validation. In the next go-round, I'll show you how to use VLOOKUP and data validation to make some Excel magic. Cheers!

Hide and Unhide in Excel

Okay this will sound like a really basic thing, but it is often overlooked by most Excel users. Hide and Unhide. Usually the write off is that it is so easy to unhide, why hide in the first place? The point being about hide and unhide, is presentation. Excel is almost like the Wizard of the Emerald Palace. There can be a lot going on, but it's just subterfuge, never mind the man behind the curtain. Likewise, Excel isn't a programming environment in which to write programs that you don't want decompiled. Excel is about presenting information and that's where you should put it first and foremost. So hide and unhide are just functions of presentation. Somethings you don't want people to readily see. You don't want to hide them from existence, just so they don't detract from what you are trying to show. So now that I've beat the gong about hide and unhide, what's it good for? Hiding stuff is useful when you want in-between calculations to be preformed but only want to show the final calculation. For an example, calculating the check digit for Universal Product Codes is not a huge task, but it can be easy to break the steps up into smaller formulas, as opposed to one giant formula. Breaking it up into smaller formulas helps end users understand what exactly is going on here. However, some users are not really worried about the details, or some power users know all the steps and do not care to be bugged with all the in between steps. Hiding those in between steps can be really useful for either of these groups. So let's take a look at how one goes about hiding and unhiding stuff in Excel. Let's take a look at a basic Excel sheet.
Now obviously, this type of sheet you would want all the information displayed, but for example sake let's say that someone wants the OSHA Fine row hidden. To do so let's click on the number seven row marker at the far right to highlight the entire row.
Now let's head over to the Ribbon and use the Home tab. Click on the Format button in the Cells group and a drop down menu appears. You will see a section called Visibility and a menu item called Hide & Unhide. Clicking on that brings up a sub-menu, you should see a Hide Rows, clicking on it hides the rows that have been highlighted, namely row seven. Also note that hovering over the sub-menu item shows that the shortcut key is CTRL+9. I do not know who thought that was an awesome shortcut key but hey it's worth remembering just in case you want to hide without the whole menu clicking thing, which is what I'm big on. Screenshot to help you visualize it all.
The same can be done for columns. Unhide allows you to undo the hide operation. The important thing to note here is that hidden things are still valid for calculations, so you can still calculate values on hidden cells, just not see them. That's what make the Hide and Unhide a presentation thing. It only changes what people see, not how things are calculated. For reference the shortcut keys are:
Hide rowCTRL+9
Hide columnCTRL+0
Unhide rowCTRL+SHIFT+9
Unhide columnCTRL+SHIFT+0

Using INDIRECT in Excel

I know, it's been awhile.

Today I want to talk about a little known function in Excel called INDIRECT.  This function takes one parameter and one optional parameter.  The required parameter is a string and the optional is ture or false.  The String passed in needs to be in the format of a cell reference, you know, "A2" or "$A$2" or even "R1C1" and "RC[-1]"  The boolean (true/false parameter) is true if you are going to use the well known A1 format, and false if you are using the R1C1 format.

So why are you providing this function the string representation of a cell?  If the string is valid it will give you the value found in the cell, if not it will give you a #REF! error.  Here's an example:

 AB
156.78Bob
2 43.15Jane
3   
4 =INDIRECT("A1") 

The value of cell A4 would be 56.78, since it is the value of the cell the string references to, A1.

Oh wow, I hear you saying.  Like that is a big deal.

If you have ever learned a thing called pointers in computer science, then this is the Excel equal to that, and you will suddenly realize how powerful this function can be.

The INDIRECT is usually at the tail end of a chain of other formulas that you will use to dynamically build formulas from formulas.  That's right, I heard you like Excel so I'm giving you INDIRECT so that you can formula while you formula!  (I know it's a bad meme.)  But that is exactly what INDRIECT does, it allows you to use other formulas (which I will cover later) to build a formula.  You use INDIRECT at the end to evaluate the formula that you built out of the formulas.

To give you an idea of this:

 AB
156.78Bob
2 43.15Jane
3   
4 =INDIRECT(B4) A1

The value of cell A4 would be 56.78 again, but this time you can see that instead of the string being written at the time the formula was written, the value from B4 is being use to contain the location of the cell that we are interested in.  If I change the value of B4, I change the formula in A4.

Next post I'll show you how to use the ADDRESS function in conjuction to INDIRECT to build a formula out some parameterized cells.